For those of you who are lucky enough to reside in WA like me, I hope you enjoyed the gorgeous sun-filled long weekend that was. My weekend was rather productive, as well as visiting my gorgeous friend and her beautiful new born bub, I rendered my courtyard.
OK, it's technically only 2 walls of the courtyard and I had a lot of help from my wonderful Mum... but who's into the semantics? I know you all want the gory DIY photos.
If anyone out there is thinking of DIY-ing... it's bloody hard work. I got quotes from a number of tradies but apparently no-one was prepared to take on such a small job (especially given the quotes I was receiving were in the range of $400-$700 for 10sqm!).
After chatting to someone at Bunnings I decided to give a certain product a try... I won't mention the name on here because in all honesty I thought it was terrible (email me if you want to know the name). It is aimed at the DIY market and you are meant to be able to apply the render using a special textured roller. Perhaps it was my technique, but despite making the render according to the packet, trying a thicker mix, trying a thinner mix it just wouldn't go on the wall the same way as in the instructional DVD. In any case, I have a Simpsons quote ala Radioactive man in my head... "the rollers, they do nothing" (as opposed to goggles).
In the end I applied render the old-fashioned way using a rectangular trowel. Here are some shots of the first coat of render (yep, rendering is messy!):


Here are the shots when the first coat was pretty much dry. As you can see, the outline of the bricks was still visible after the first coat. (I should note the product I used was designed to be applied in two coats to ensure full coverage).
.JPG)
.JPG)
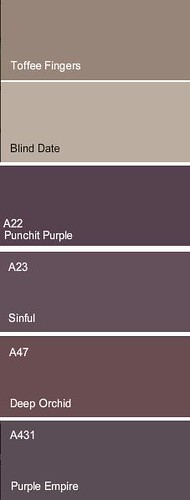
.JPG) I still need to take some photos of the second coat of render, so stay tuned for more... In the meantime I get to analyse the 30-odd paint swatches I picked up over the weekend and try to decide what colour to paint my pretty.
I still need to take some photos of the second coat of render, so stay tuned for more... In the meantime I get to analyse the 30-odd paint swatches I picked up over the weekend and try to decide what colour to paint my pretty.
Oh... and I really need to get around to planting my plants. My collection seems to have grown exponentially and I'm yet to plant a thing! I guess there's always next weekend...

(Ignore my washing in the corner of the next shot... that corner of my garden is nice and sunny!).


.JPG)
.JPG)
.JPG)


