Sunday, November 7, 2010

Living vicariously

Apologies again for being a terrible blogger, between quitting my job and starting somewhere new, my life has been a bit hectic to say the least! It also means that all my inspiration to have my garden looking gorgeous has all but gone out the window!

In the mean time I've been helping my parents around their place and living vicariously through their zhoosh-ing of their home. The most recent task was updating their bathroom... now for the record this bathroom was renovated at least 15 years ago, so it definitely needs to be completely redone. However, for the interim, the decision was made to paint it black and add a chandelier which Mum has lying around the house (as you do...). Let me know what you think of the results.

PS - damn bathrooms are hard to photograph, especially when they are this tiny!

The Befores:

As you can see the bathroom is relatively plain and in a somewhat traditional style - black and white floor tiles laid diagonally, white wall tiles with black feature tiles. The mirror needs to be replaced and the pedestal sink is a little outdated.


During:

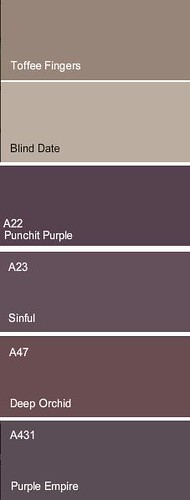
Picking a paint colour (and making sure we were happy with such a bold choice!). We ended up using "black orbit" which is a British paint colour if I recall correctly. When it's wet it looks navy, but it dries darker. It's not a pure black, but is pretty close.


After:

Ta da! OK we aren't 100% finished, as you can probably see the door and door frame needs to be painted and there are some finishing touches to be added. Mum is thinking of putting some black and white prints on the wall and possibly putting a black frame around the mirror. I'll keep you posted.


Overall we are really happy with how it's turned out. It makes for a pretty dramatic statement to say the least! When we were picking out the paint the chick at Bunnings half-scared me by suggesting that it would be too dark. But by keeping the ceiling white and having the white wall tiles - it's enough to balance out the black and make for one interesting bathroom.

Monday, October 4, 2010

The best laid plans...

I had the most productive weekend planned... I was going to paint my newly rendered courtyard walls and plant the garden, buy some pots and funky plants and start painting my outdoor furniture.

So what did I actually get done? Well my walls are painted:


I ended up going with a taulbmans colour called "Hamstead" (but due to some major tinting issues when getting sample pots, I ended up using British paints and getting it colour matched). For reference, it was the upper right colour from my previous post.

As for the rest of my "to do" list... what can I say? I got a better offer. A friend took some of us over to Rottnest Island on his boat to watch the AFL grand final (version 2.0). I have to say I was personally much more interested in enjoying a day out in the sun as opposed to the footy.


Photos taken on my iPhone and made to look pretty using the "Polarize" app.

Friday, October 1, 2010

I'm in my own personal hell

I'm surrounded by 30-odd paint swatches, 5 sample pots, a dulux colour brochure I've pulled to pieces so I can hold the colours next to one another and analyse them in greater detail... I've been to Bunnings twice due to the lack of ability of the 12 year old working in the paint section to correctly tint my sample pots... and I'm no closer to an answer!


What colour do I paint my walls?!?!


(Click on the picture for a larger view).

OK to start out I'll say that I totally hate the colour on the left, it looks lavender (in my defence it looked grey in the colour chart)... so I think I've narrowed it down to one of the darker colours. I'm not sure whether to go with the more brown based colour (upper far right) or grey based colour (lower far right).

You can see a tiny hint of a light grey I tested (very bottom of the picture, to the right of the pole) - another one that just didn't work, since it was far too light. The one major advantage of the darker colours is they seem to hide the imperfections on my walls... which, having regard to my DIY rendering skills is a bonus.

As always thoughts, comments and suggestions are always appreciated. I will be painting tomorrow so decisions must be made!

Thursday, September 30, 2010

I Rue You

I was so excited to stumble across a new online magazine "Rue". Not only is it totally gorgeous and available online for free, it's first issue features the home of one of my favourite bloggers - Victoria from sfgirlbybay.

Here are some images of her amazing home. I just adore how she uses the blank canvas of black and white walls to frame her ever-changing collections.


*Sigh* - I think I just died and went to interior design heaven reading Rue.

As a side note, does anyone happen to know where that bedspread with the birds on it is from? I'm in love and think I need to have it.

Wednesday, September 29, 2010

Rendering - the after shots

As promised yesterday, here are some after shots of my DIY rendering skills. Take that silly renderer who promised he could do the job on Saturday and then conveniently ignored all my calls and messages to confirm what time he was coming!

I still need to sand back some patches to even things up, but I think she will look beautiful once she's had a lick of paint.


Tuesday, September 28, 2010

What I did this weekend...

For those of you who are lucky enough to reside in WA like me, I hope you enjoyed the gorgeous sun-filled long weekend that was. My weekend was rather productive, as well as visiting my gorgeous friend and her beautiful new born bub, I rendered my courtyard.

OK, it's technically only 2 walls of the courtyard and I had a lot of help from my wonderful Mum... but who's into the semantics? I know you all want the gory DIY photos.

If anyone out there is thinking of DIY-ing... it's bloody hard work. I got quotes from a number of tradies but apparently no-one was prepared to take on such a small job (especially given the quotes I was receiving were in the range of $400-$700 for 10sqm!).

After chatting to someone at Bunnings I decided to give a certain product a try... I won't mention the name on here because in all honesty I thought it was terrible (email me if you want to know the name). It is aimed at the DIY market and you are meant to be able to apply the render using a special textured roller. Perhaps it was my technique, but despite making the render according to the packet, trying a thicker mix, trying a thinner mix it just wouldn't go on the wall the same way as in the instructional DVD. In any case, I have a Simpsons quote ala Radioactive man in my head... "the rollers, they do nothing" (as opposed to goggles).

In the end I applied render the old-fashioned way using a rectangular trowel. Here are some shots of the first coat of render (yep, rendering is messy!):


Here are the shots when the first coat was pretty much dry. As you can see, the outline of the bricks was still visible after the first coat. (I should note the product I used was designed to be applied in two coats to ensure full coverage).


I still need to take some photos of the second coat of render, so stay tuned for more... In the meantime I get to analyse the 30-odd paint swatches I picked up over the weekend and try to decide what colour to paint my pretty.

Oh... and I really need to get around to planting my plants. My collection seems to have grown exponentially and I'm yet to plant a thing! I guess there's always next weekend...


(Ignore my washing in the corner of the next shot... that corner of my garden is nice and sunny!).


Thursday, September 23, 2010

Operation ugly courtyard - stage one

Step one of (trying to) make some improvements on my front courtyard was the tackle the problem of the ugly cream paving.

I was going to borrow a high-pressure cleaner from a neighbour. Unfortunately I was pipped at the post as they had recently lent it to another friend.

Down but not out, I ventured off to good ol' Bunnings to see what advice they could give me. The gentleman working there recommended that I give "30 seconds" a try.

Here are the essential ingredients if you're thinking of trying this for yourself:
(a) A broom (this is important if you have a lot of moss - you'll be scrubbing more than Cinderella);
(b) A sprayer (I picked up a cheapie which is meant for spraying plants, you could just use a watering can); and
(c) The product.


The whole process was exhausting! But I'm pleased with the results. To give you a brief summary of what's involved I first diluted the product with water and sprayed it over the affected areas. I then did a bit of initial scrubbing to start the cleaning process and then left the product for about 20 minutes. When I came back I made another small bucket of the diluted product which I dipped my broom into. This allowed me the chance to add more product on those tougher areas. A lot of scrubbing later, I rinsed the product off my paving.

Here's a before shot (you can see the difference in the bricks from the areas which are sheltered and those that aren't).


Here's the after shot - as you can see, it isn't perfect but it has come leaps and bounds from where it was.


A final note - for anyone who's planning on DIY-ing, 30 seconds is a bleach-based product. This means you have to be careful - wear some old / ugly clothes and if you have plants nearby, it would be best to wet the garden bed before applying the product. This should help to ensure that any product run-off is diluted and doesn't kill your plants.

Tuesday, September 21, 2010

Operation ugly courtyard - colour choices

Now that I've put myself into hardcore "must make my courtyard look pretty" mode, I've got myself into some what of a dilemma. I'm pretty much set on the idea of having the two walls in question rendered (whether it's a DIY job or paying someone to do it). Obviously the next tough choice is what colour to paint the rendered walls!

colours

Here are a few colours I've taken screen shots of from the Dulux website. I'm tossing up between using a neutral beige / brown / taupe / grey and something purple. Well maybe not purple purple... possibly something in the aubergine colour family. I know the colours on the website aren't necessarily the most accurate representation, so I will check them out in store before making a final decision... but I'm quite liking purple empire and sinful.
Thoughts, comments, suggestions? Have you done something similar? Do you have a favourite paint colour you thing would work with my "gorgeous" cream paving? Let me know.

Operation ugly courtyard - the action plan

If you haven't already noticed, I've become somewhat garden obsessed lately. Maybe it's the gen y in me - I want it all done and I want it done now. For better or for worse, that's how I feel at the moment.

On the upside, it also means I've been really motivated to get some things done.

Here's the courtyard. It leads off my kitchen, so it would be nice to have a prettier outlook.


As you can see, at the moment it's really really boring, bland, ugh. Cream brick walls, cream brick paving, cream paint on the woodwork. This courtyard has an L-shaped garden bed. Ideally I would like to have the two walls behind the garden bed rendered so that I can paint them and inject some personality into this space. At the moment I'm considering using Dulux's full cover texture paint which supposedly acts like render and will cover brick mortar joints. Stay tuned to this space to see what I decide.


There is this random panel of picket fencing in the courtyard which is painted cream and looking worse for wear. It's the same colour as the entry gate and the pergola. Ideally I want to paint it all (even if it is just in a similar colour to freshen it up). I'm unsure of the colour choice, it will come down to whether I render / paint the walls.


Paving... ideally I would love to rip it all up and replace the lot. However in reality I do not have an unlimited budget. The easy solution is to clean up the pavers and try to get rid of some of that mould / moss.


Here is a view of the rest of the courtyard. You know how people house-sit? Well I'm pot-plant and BBQ sitting at the moment. Long story short, these lovely babies won't be mine much longer.


Here is my starting collection of plants, can't wait to get these babies planted.


Next issue - the ugly shade cloth. Why oh why someone would put this in in the first place is beyond me. In any case, I need to rip it down stat.


Pwoa, I'm feeling tired just reading over this post and everything I want to do. I better get cracking!

Monday, September 20, 2010

Magazine inspiration - Part 5

It seems like ages since I've posted images of one of the many (many) homes which inspired me in undertaking my renovations.

Here is a gorgeous property, as featured in Home Beautiful Magazine. I think what I love most about this property is the way they have incorporated a bit of that mid-century feel into what is a very sleek and contemporary home.


SCAN0033


I'm loving the Eames DSW chairs and collection of vintage bottles on the table.


SCAN0034


We all know I love a good vintage style sideboard - this one featured above, in combination with the French poster is a winner in my books.


SCAN0035


Want to steal their style? You could start with a few replica eames chairs from Matt Blatt (not bad at $99 a pop). As you can see these chairs are super sexy, even teamed with a relatively simple table. They come in red and black as well, if you want a hint of colour in your life:


If you're like me and love a bit of vintage glassware, eBay is the place for you to be. Here are a few gorgeous examples I found currently on offer from the seller atlantictreasure. While they are a bit chunkier than the ones pictured above, I think the colours are amazing.


Finish it all up with a retro poster and voila - your home might be featured in Home Beautiful one day!