Showing posts with label DIY. Show all posts

Sunday, November 7, 2010

Living vicariously

Apologies again for being a terrible blogger, between quitting my job and starting somewhere new, my life has been a bit hectic to say the least! It also means that all my inspiration to have my garden looking gorgeous has all but gone out the window!

In the mean time I've been helping my parents around their place and living vicariously through their zhoosh-ing of their home. The most recent task was updating their bathroom... now for the record this bathroom was renovated at least 15 years ago, so it definitely needs to be completely redone. However, for the interim, the decision was made to paint it black and add a chandelier which Mum has lying around the house (as you do...). Let me know what you think of the results.

PS - damn bathrooms are hard to photograph, especially when they are this tiny!

The Befores:

As you can see the bathroom is relatively plain and in a somewhat traditional style - black and white floor tiles laid diagonally, white wall tiles with black feature tiles. The mirror needs to be replaced and the pedestal sink is a little outdated.


During:

Picking a paint colour (and making sure we were happy with such a bold choice!). We ended up using "black orbit" which is a British paint colour if I recall correctly. When it's wet it looks navy, but it dries darker. It's not a pure black, but is pretty close.


After:

Ta da! OK we aren't 100% finished, as you can probably see the door and door frame needs to be painted and there are some finishing touches to be added. Mum is thinking of putting some black and white prints on the wall and possibly putting a black frame around the mirror. I'll keep you posted.


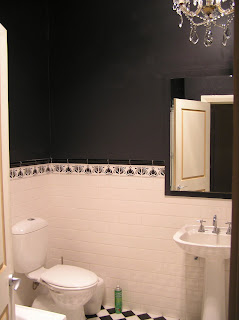


Overall we are really happy with how it's turned out. It makes for a pretty dramatic statement to say the least! When we were picking out the paint the chick at Bunnings half-scared me by suggesting that it would be too dark. But by keeping the ceiling white and having the white wall tiles - it's enough to balance out the black and make for one interesting bathroom.

Wednesday, September 29, 2010

Rendering - the after shots

As promised yesterday, here are some after shots of my DIY rendering skills. Take that silly renderer who promised he could do the job on Saturday and then conveniently ignored all my calls and messages to confirm what time he was coming!

I still need to sand back some patches to even things up, but I think she will look beautiful once she's had a lick of paint.


Friday, April 16, 2010

Antler hook - the final chapter

Reading back on my previous post I really hope that I'm not portraying any negative gender stereotypes, I'm just not that handy!
In all seriousness, are there any websites out there with basic information (for chicks or the less handy among us) for those of us attempting DIY jobs? There has to be some way to let a girl (who has never used a drill before) know that there is "hammer" function on a drill which you're meant to use when you are drilling into bricks. Or at least without going to the hardware store 4 times!
Anyway, it's done! Can I have a hallelujah anyone?

Now I'm not going to pretend I wasn't scared when I put my bag on there!

While I was on a roll, I even managed to hang this tassel curtain in my bedroom (over the top of the existing roller blind).

No other interesting updates for today. I promise I'll avoid (or at least try) complaining about my lack of DIY skills in the future!

Thursday, April 15, 2010

Attempting to hang the antler hook - version 2.0

I have been lucky enough to have a day of annual leave today. No work - what more can a girl ask for? I slept in, had a coffee with a friend, a late brekkie with another and went clothes shopping.

Self-indulgence out of the way - I thought I'd try once more to hang my antler hook.

With the help of my cousin, the drill piece was now in my drill. I took my time and carefully measured the exact spots on the wall. I was now ready to start drilling.... Drill in hand, I plugged it into the wall and brought it over and was ready to go. One minor issue - the cord was too short and I don't have an extension cord at my place. *face palm*

I proceeded back to the hardware store for the 10,oooth time. Ten minutes and $5 later - I'm ready to go once again. Let the drilling commence! I line the drill up with my marking and press the button...

The drill turns, I hear a noise - is that the sweet sound of success? I press harder, dust from the plaster starts falling around me, my hopes are raised and then nothing. The drill piece is half way in and won't go any further.

I don't know if it's my technique or the drill piece itself but ahhhhh! I think I need to rename this blog "Tales of an un-handy woman" at the rate I'm going.

Saturday, April 3, 2010

Technology, schmeknology

Blog readers out there, I have a terrible secret I have to confess. OK it's not so terrible, nor is it a secret... I'm single. Yes, you read correctly. I am without a man in my life. Tragic, right? I mean how on earth am I meant to make decisions on my own?

Putting all my sarcasm aside, there are times, like today, when I wish I had a handy person in my life.

Exhibit A: remember the funky antler hook I posted about recently, I thought I would hang it on my wall.


Being the independent and capable woman that I am, I strolled down to Bunnings (antler hook in toe) and bought the necessary supplies...


Wall plugs - check
Screws - check
Drill - check
Correct sized drill piece - check

I then proceeded to my good friend google and found a tutorial on what I was meant to be doing (don't laugh!). Following the same, I measured a plug against my drill piece and put masking tape on the piece - so I don't drill too far. There I was - ready and able to go... for the life of me do you think I can figure how to put the drill piece into my drill? No, of course not!

So for the time being at least, my lovely antler hook remains on my table.

Annoyed, but not yet defeated I thought I would set up my TV... can't be too hard right? So I hook it up, attach the antenna cable - "poor connection or signal". Ahhhhhh!!!!

Today is just not my day.

Tuesday, March 23, 2010

Mirror update

Excited by the prospect of my new project, I decided to drop by Bunnings after work and pick up some paint for my mirror.
Here is a before shot - as you can see it was a brass colour to begin with.


For ease, I decided to use a can of spray paint. It was a thrifty option as well, I think the can only set me back $7 or $8.

I was so keen to see if this would work, that I ended up painting it outside (in pitch black) from about 7:30 - 9pm. Here's a progress shot:

Here's another progress shot from this morning - I had used newspaper and masking tape to cover the mirror. Amazingly, it came off perfectly - not a drop of paint on the mirror!

And here's the finished product:

It's quite heavy, so it wasn't particularly easy to get a shot of it against a wall! I'll be sure to post another picture when I've decided where it's going and actually hang it.

Voila! A funky mirror for less than $50.

P.S - look what I found while flicking through the February / March 2010 edition of Belle magazine!

belle

Is it really wrong that I want to re-paint my mirror red?