Showing posts with label Before photos. Show all posts

Sunday, November 7, 2010

Living vicariously

Apologies again for being a terrible blogger, between quitting my job and starting somewhere new, my life has been a bit hectic to say the least! It also means that all my inspiration to have my garden looking gorgeous has all but gone out the window!

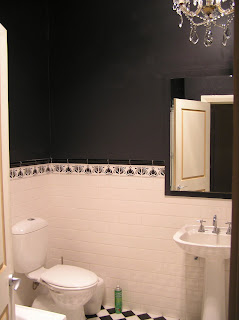
In the mean time I've been helping my parents around their place and living vicariously through their zhoosh-ing of their home. The most recent task was updating their bathroom... now for the record this bathroom was renovated at least 15 years ago, so it definitely needs to be completely redone. However, for the interim, the decision was made to paint it black and add a chandelier which Mum has lying around the house (as you do...). Let me know what you think of the results.

PS - damn bathrooms are hard to photograph, especially when they are this tiny!

The Befores:

As you can see the bathroom is relatively plain and in a somewhat traditional style - black and white floor tiles laid diagonally, white wall tiles with black feature tiles. The mirror needs to be replaced and the pedestal sink is a little outdated.


During:

Picking a paint colour (and making sure we were happy with such a bold choice!). We ended up using "black orbit" which is a British paint colour if I recall correctly. When it's wet it looks navy, but it dries darker. It's not a pure black, but is pretty close.


After:

Ta da! OK we aren't 100% finished, as you can probably see the door and door frame needs to be painted and there are some finishing touches to be added. Mum is thinking of putting some black and white prints on the wall and possibly putting a black frame around the mirror. I'll keep you posted.




Overall we are really happy with how it's turned out. It makes for a pretty dramatic statement to say the least! When we were picking out the paint the chick at Bunnings half-scared me by suggesting that it would be too dark. But by keeping the ceiling white and having the white wall tiles - it's enough to balance out the black and make for one interesting bathroom.

Wednesday, September 15, 2010

Before and Afters - the Kitchen

Ahh yes the kitchen. I'm sure I've posted a few progress shots along the way, but I don't recall if I ever provided full on gory before shots. Looking at them now I have to admit I don't remember it being that bad.

Before:

Here it is in all it's cream and brown glory.

You'll see in the after shots I chose to lose the pantry to open up the space.


During:


Carcass of the kitchen cupboards being installed.


After:

P1010127

P1010137

P1010133

P1010130

P1010136


P1010142

P1010140

P1010146


Is it my ideal kitchen, no... if I had the opportunity to do things again, would I change anything... maybe, but hindsight is a bitch. At the end of the day, I do love it. Even if I still dream about having extra money in my budget to install stone bench tops in as opposed to laminate. I think I made the right decision for my house and the market when (if ever) I sell.

Sunday, July 11, 2010

Before and Afters - Living room

I'm not sure if I have any readers left, after being on a blog hiatus for so long! If anyone is left out there - hello and please accept my apologies.

Before I entered into my hiatus, I know I promised that I would post some official before and after shots. I'm not one to re neg on my promises, so here is a little taste to wet your appetite... my living room, then and now!

Before:

Here is a photo looking from my kitchen to my dining and living rooms.

You can see at the end of the picture, there is an area separated from the living area by a half-height wall. I'm not sure what the intended purpose of this space was, but the half-wall rendered it pretty useless. I had considered opening it up into the living room, but this would have made for an unusual space. Instead, I converted the space into a third bedroom.

Here is another picture of the living room, with a view of what is now the third bedroom and into my hallway.

You can see in the third bedroom, there was once a large space with a desk (far left of the photo). This ended up being the perfect size to install a built in wardrobe.


During:

Here is a picture from a similar position as the first image. As you can see, at this point in time the area has been separated off to create the third bedroom and the flooring has been laid.


Here is a picture of the wardrobe in the third bedroom.

And just another shot of the newly created room. I don't have any "official" afters as the room is now occupied by by housemate. (I can only guess that it's probably messy!)


Afters:


Ta-da - the finished room!


The Barcelona chairs are a new addition to my home, as of this weekend! I manged to pick the pair up for a bargain price.

PS - do you spy my target mirror in the back? I only just got around to hanging it.


My vintage sideboard and collection of amber glassware.


Here's a close up of my display. Don't you just love the ram's head? We won't talk about the issues I went through in hanging that baby!


I hope you guys enjoy the photos. I'll be sure to include some pics of my kitchen soon (it needs a bit of a clean!)

Saturday, December 26, 2009

The befores

A bit about me:

I've been obsessed with houses and design for as long as I can remember. I think I have probably read every issue of vogue living, home beautiful and a myriad of other home magazines since I was 18 (I'm now 26).

When it came time for me to buy a home I searched for a long time to find something that was right for me. One unfortunate thing I came across in my search was the number of properties that had been renovated using cheap (and generally ugly) finishings. With this in mind I intentionally bought an unrenovated property - located in a great street and which was quite large in size for a 2 bedroom villa.

I personally don't believe you have to spend top dollar to get great results. With this in mind, I have decided to embark on my own renovation journey. I flip flop between design styles, I love clean modern lines and have a soft spot for mid-century furniture. Hopefully I can bring the two looks together and achieve a cohesive look. Wish me luck!

Here are the photos of the property before the renovations began.

The kitchen:


Dining area, looking to kitchen:


The bathroom:


Living area / study: